Table of Contents
Have you ever wanted instant alerts for key changes in your data? With Looker Studio Alerts, you can now send automatic emails to any stakeholder about significant data changes in your business. Keeping track of your data and receiving timely updates is crucial for every marketer. This guide will walk you through what Looker Studio Alerts are, how they work, and how to set them up in your reports. By the end, you’ll be able to utilize Looker Studio Alerts to ensure you never miss important data insights.
What are Looker Studio Alerts?
Looker Studio Alerts enable you to set up notifications that trigger when your data meets specific conditions. These alerts can be configured to track specific charts in your reports, ensuring that your colleagues and clients are notified when key metrics meet milestones or predefined thresholds. This proactive method allows you to react quickly to significant data changes in your business, enabling you to make better decisions in real time.
For instance, you can create alerts in Looker Studio that are triggered when:
- Your total traffic increases by a certain percentage compared to the previous day or week.
- Your organic traffic drops by a notable percentage week over week.
- There’s a significant spike in direct traffic.
- You had more sales yesterday than the the same day previous week.
- Your conversions from ads were down vs previous month.
Google released alerts in the Looker Studio platform back in November 2023. This was one of the highest-voted feature requests from the Looker Studio community. The main reason is that many marketers have used similar alarm systems in Google Analytics to get notified when traffic or other key metrics drop by a certain percentage.

However its important to note that for the time being this feature is available only to Looker Studio Pro users. That mean that free users are not able to utilize alerts for their report. Even for the the Pro, alerts are not available for the content created in Looker Studio free version.
How Looker Studio Alerts Work
Looker Studio Alerts function by continuously monitoring your data based on the conditions you set. When the data in a specified chart meets these conditions, Looker Studio sends an email notification to the specified recipients. The notification includes details about the condition that was met, the time it occurred, and a link to the original report.
To allow a report viewer to set alerts, the editor of the report must enable viewers to view and create alerts. This setting can be accessed through the report sharing settings. By enabling this feature, viewers can set up their own alerts based on the metrics they are interested in, enhancing the collaborative data monitoring experience.

How to Use Looker Studio Alerts
Setting up Looker Studio notifications is pretty simple. Follow these steps to create alerts in your reports:
Step 1: Open your report
Log into your Looker Studio Pro account. Open a report that you want to set alerts on. Then go to View mode, as alerts cannot be added or edited in Edit mode.
Tip: Ensure that the report is created by a Pro user or has been upgraded to Pro. To upgrade your existing Looker Studio content to Looker Studio Pro, move your reports and data sources from your “Owned by me” into a team workspace or your “Sandbox” under a Pro project. This will enable you to immediately use Looker Studio Pro features with your upgraded content.

Step 2: Add an Alert
- Hover over the chart you want to create an alert for.
- Click on the bell icon that allows you to Create & view alerts.
- It will pop up the Create Alert dialog.
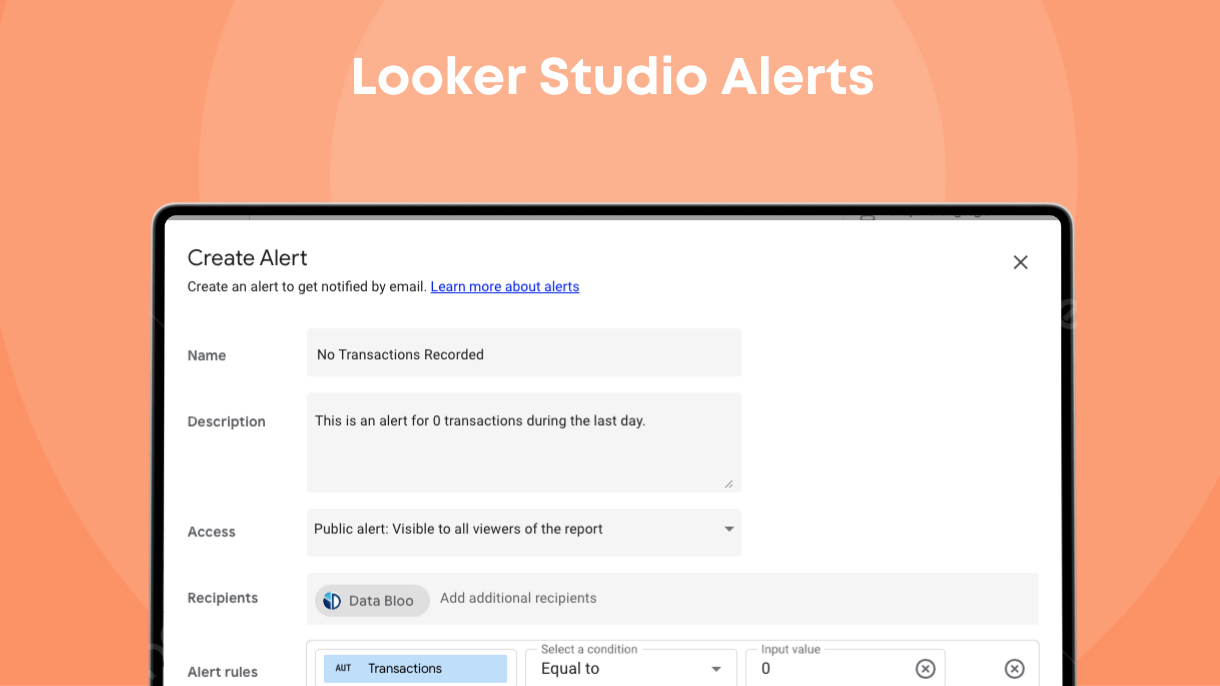
Step 3: Configure the Alert
Enter the following details to setup your alert:
- Name: Provide a name for your alert.
- Description: Optionally, add a description for additional context. This will be shown in your email.
- Access: Choose whether the alert is visible to all viewers of the report or only to the alert owner.
- Recipients: Add email addresses of the recipients (they must be members of your organization).
Step 4: Set Alert Rules
In the Alert rules field:
- Select the field you want to monitor.
- Choose the condition that the field should meet (conditions vary based on the data type).
- To add another condition with AND logic, add additional fields and conditions.
Step 5: Configure Timing
- Start Time: Set the date and time for Looker Studio to begin checking the alert conditions.
- Repeat: Select how frequently Looker Studio will check the conditions (e.g., daily, weekly, or custom intervals).
Click Save to finalize your alert setup.

How to Edit, Pause, or Delete Alerts
To make any changes to existing alerts on your report, you need to follow the below action:
- Edit an Alert: Open the report in View mode, hover over the chart with the alert, and click the Create & view alerts bell icon. Click the three-dot More Options button next to the alert you want to edit, select “Edit,” update the details, and click “Save.”
- Pause an Alert: In the Create & view alerts dialog, toggle the Active switch next to the alert to pause or unpause it.
- Delete an Alert: In the same dialog, click the three-dot More Options button next to the alert you want to delete, and select “Delete.” Note that deleted alerts cannot be restored.

Troubleshooting Alert Execution
Sometimes, alerts in Looker Studio may fail to execute. If an alert fails, you will receive a notification like this:

While there is no direct workaround to test an alert, you can ensure that your alert is correctly configured and remember the expected conditions under which you should receive the alert. Regularly check your report and alert settings to verify that everything is functioning as intended. If an alert fails, review and adjust the alert conditions or settings as needed to reactivate it.
Practical Examples of Setting Up Looker Studio Alerts
Setting up notifications in Looker Studio can help you monitor key metrics about your business and act quickly to notable changes in your data. Here are five practical examples adapted for Looker Studio:
1. Organic Traffic Decline Week-over-Week
This alert notifies you when there is a significant drop in the number of organic visitors to your website. This could show issues with specific organic pages on your or technical problems on your site.
Configuration for Organic Traffic Decline Alert:
- Alert Name: Organic Traffic Drop -20% WoW
- Alert Conditions:
- Metric: Total Users
- Condition: Less than
- Value: add a value which is 20% less than your weekly average
- Filter: Medium contains “organic”
- Period: Weekly
2. Spike in 404 Page Errors
This alert lets you know if there is an increase in 404 errors, indicating potential technical issues with your website.
Configuration for 404 Page Errors Alert:
- Alert Name: 404 Errors Increase +10% WoW
- Alert Conditions:
- Metric: Page Views
- Condition: Greater than
- Value: add a value which is 10% more than your weekly average
- Filter: Page Title contains “Not Found”
- Period: Weekly
3. Surge in Social Media Sessions
This alert helps you track the impact of social media campaigns by notifying you of a sudden increase in sessions from social media platforms.
Configuration for Social Media Surge Alert:
- Alert Name: Social Media Surge +100 Sessions
- Alert Conditions:
- Metric: Total Sessions
- Condition: Greater than
- Value: add a value which is significantly higher than your daily average
- Filter: Medium matches regular expression “twitter|facebook|instagram|reddit”
- Period: Daily
4. No Transactions Recorded
This alert is crucial for any e-commerce manager to be notified if there have been no transactions for a specific day.
Configuration for No Transactions Alert:
- Alert Name: No Daily Transactions
- Alert Conditions:
- Metric: Transactions
- Condition: Equals
- Value: 0 (given that your site has a few transactions on a daily basis)
- Period: Daily
5. High Bounce Rate on Paid Traffic
This alert is really helpful for any PPC professional who wants to identify issues with the landing page or marketing messaging. It is triggered when there is a high bounce rate on paid campagins.
Configuration for High Bounce Rate on Paid Traffic Alert:
- Alert Name: Paid Traffic Bounce Rate > 10%
- Alert Conditions:
- Metric: Bounce Rate
- Condition: Greater than
- Value: add a value which is 10% more than your daily average
- Filter: Medium includes exactly “cp.|ppc|paid”
- Period: Daily
By configuring these alerts, you can ensure that you are notified on time when significant changes in your key metrics happen.
Get Notified on Time with Alerts
Looker Studio Alerts are a powerful feature for staying on top of notable data changes in your reports. By setting up alerts, you can receive notifications for significant drops or spikes in your business performance, allowing you to make better decision quickly. For a more detailed and customized reporting experience, explore our ready-to-use template designed to save your time.